SUPPLIES NEEDED TO MAKE DREAMCATCHERS:
~ wooden embroidery hoop
~ washi tape
~ yarn
~ felt (small piece)
~ polyester batting (a very small amount)
~ needle and thread
~ beads (we used pony beads and wooden beads)
~ pom-pom maker (optional)
~ paper pinwheels made from sulphite paper (instructions here – we made them 4″ diameter)
~ watercolors
~ piece of wire for hanging (silver or colored)


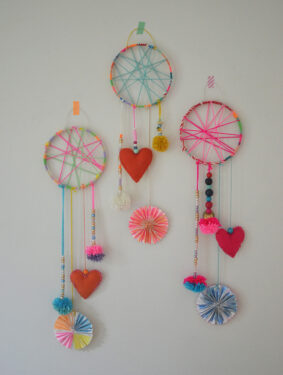
STEP-BY-STEP DREAMCATCHER INSTRUCTIONS:
1. The kids started by covering their hoop with little pieces of washi tape. They can either tear the tape or use small scissors. Anything goes!
2. Next they chose two colored yarns and wrapped them around the hoop. I don’t have photos of this part because I was helping them get started. Once they got the hang of it, it only took a few minutes for them to wrap both yarns tightly. (If the kids wrap too loosely then the yarn will slide. Make sure it’s tight, and if not then pull at it a little in places. You could also use a dot of hot glue gun if necessary.)


3. Next came the sewing part. I had a nice pile of different colored felt left over from my garland project so I let the kids choose their own two colors for their heart. I drew a heart on paper first then used it as a template. The hearts are about 3.5″ wide.


4. When threading the needle, double the string and then tie a knot at the end. This way, the thread will never fall out of the needle. I showed them the whip stitch and I was amazed at how quickly they got it. I kept an eye on them just so the two sides wouldn’t shift too much, but they did all of the sewing themselves and felt SUPER proud. (Here is a great YouTube tutorial for beginners on the whip stitch.)
5. We left a little opening to put in the stuffing. I stitched the heart closed for them.

6. When they finished sewing, I had a station set up with the paper pinwheels (pre-made in the interest of time) and watercolors. I did not have a chance to take any photos, but here is my pinwheels post where you can see how fun it is to paint 3D paper! (It takes four pieces of paper to make one pinwheel, my paper size was 3″ x 4″.) We let them dry a bit and then punched a hole at the top.
7. Next, the girls made two pom-poms each. We used pom-pom makers, but you can use any method that works for you. (Here is a good tutorial on traditional pom-pom making with a cardboard circle.)

8. The last step was the most fun – putting it all together! I cut four pieces of string; one for each pom-pom, one for the pinwheel and one for the heart. (I used a larger needle to get the yarn through the top of the felt heart.) They strung beads on some of the strings. I also brought out some old buttons which they loved. Then I tied them onto their hoop at varying lengths. I found some old, colored wire and I made a hook at the top (which I secured with the hot glue gun).
Ready to hang up and catch those bad dreams!
ArtBarBlog